The allure of a farmhouse dining table, with its rustic charm and inviting presence, is undeniable. Yet, the price tag for a store-bought piece can often be a significant deterrent. Imagine creating a beautiful, sturdy centerpiece for your home that not only perfectly suits your aesthetic but also fits your budget. Building your own DIY farmhouse dining table is a rewarding project that allows for complete customization, from the size and style to the finish. This comprehensive guide will walk you through everything you need to know, empowering you to craft a timeless piece that will gather friends and family for years to come.
Common DIY Farmhouse Table Styles
When embarking on a DIY farmhouse dining table project, you’ll discover a variety of styles that can be achieved with readily available lumber and basic woodworking techniques. These styles offer different aesthetics and levels of construction complexity, allowing you to choose one that best fits your skills and vision.
Classic Rectangular Farmhouse Table
|
Our Picks for the Best Dining Table in 2026
As an Amazon Associate I earn from qualifying purchases.
|
||
| Num | Product | Action |
|---|---|---|
| 1 | Walker Edison Durango Distressed Solid Wood Dining Table, 72 Inch, Mahogany |

|
| 2 | Signature Design by Ashley Coviar 5 Piece Counter Height Dining Set, Includes Table & 4 Barstools, Brown |
|
| 3 | Signature Design by Ashley Bridson 6 Piece Dining Set, Includes Rectangular Dining Table, 4 Ladderback Chairs & Bench, Wood, 36" W x 60.13" D x 30" H, Gray |
|
| 4 | IDEALHOUSE Dining Table Set for 4, Kitchen Table with Upholstered Bench, Rectangular Dining Room Table Set with 2 Benches, 3 Piece Kitchen Table Set for Small Space, Apartment, Studio, Rustic Brown |
|
| 5 | CONSDAN Small Dining Table for 2, Extendable Dining Table, Walnut Veneer and Solid Wood Structure – Space-Saving Design, Ideal for Compact Dining Space and Expands for Larger Dining Areas |
|
| 6 | Black Round Dining Table for 6 - Modern Circle 51 Inch Large Room Kitchen Dinning Tables for 4 to 6 Person Seats Small Spaces Wood Dinner Mesa De Comedor Redonda |
|
| 7 | East West Furniture NFT-BLK-T Norfolk Kitchen Table - a Rectangle Dining Table Top with Butterfly Leaf, 32x54 Inch, Black |
|
| 8 | Winsome Groveland Wooden Square Dining Table |
|
| 9 | VECELO 3-Piece 63" Extendable Kitchen Table with Benches/Chairs, Modern Breakfast Dinette/Dining Room Set for 4/6/2, Small Space Saving Design, Easy Assembly |
|
| 10 | Dining Table for 6-8, 63" Large Kitchen Table, Industrial Dining Room Table, Wooden Rectangular Table with Adjustable Feet, for Dinner, Kitchen, Walnut and Black CZ03BH |
|
The classic rectangular farmhouse table is perhaps the most iconic and often the simplest to construct. It typically features straight, robust legs, often 4x4s, connected by a straightforward apron and stretcher system. This design emphasizes clean lines and a strong, unpretentious form, making it incredibly versatile for various interior decors. Its inherent sturdiness ensures it can withstand daily use, becoming a focal point in any dining space.
Trestle Farmhouse Table
For those looking to add a touch more architectural detail, the trestle farmhouse table presents an elegant option. This style is characterized by its distinctive base, often featuring an “X” brace or solid leg structures at each end, connected by a central beam. While potentially requiring a bit more precision in cutting angles, a trestle base adds a sophisticated yet rustic element, providing ample legroom without traditional corner legs.
Square Farmhouse Table
A square farmhouse table offers a charming alternative, particularly well-suited for smaller dining areas or as an accent piece in a larger room. This configuration encourages intimate conversations and creates a balanced visual presence. The construction principles are similar to the rectangular design, simply adjusted for equal length and width dimensions. Its compact footprint can make a square table an ideal choice for cozy nooks.
Modern Farmhouse Table
The modern farmhouse style blends rustic warmth with contemporary minimalism. For a DIY project, this often translates to cleaner lines, less distressing, and sometimes a two-tone finish – perhaps a painted base paired with a natural wood top. While true modern farmhouse designs might incorporate metal elements, a budget-friendly DIY version focuses on achieving that sleek, uncluttered look primarily through wood and thoughtful finishing. This style proves that a farmhouse table can be both inviting and on-trend.
Essential Materials and Tools for Your DIY Farmhouse Table
Building a farmhouse dining table on a budget hinges on smart material selection and having the right tools. Focusing on economical wood choices and versatile tools will ensure your project is both successful and cost-effective.
Lumber Selection
Choosing the right wood is crucial for both the aesthetic and the budget of your farmhouse table.
- Economical Wood Choices: Pine, Whitewood, and Douglas Fir are excellent, budget-friendly options. They are widely available at most lumberyards and home improvement stores. While softer than hardwoods, they are easy to work with and contribute to the rustic look as they develop a natural patina over time.
- Tips for Selecting Lumber: Take your time at the lumberyard. Look for boards that are as straight and flat as possible, free from significant warping, bowing, or twisting. Avoid pieces with large, loose knots or any splits, cracks, or missing chunks, especially on edges that will be joined together. Clear lumber (free of knots) is ideal for a smoother finish, but smaller, tight knots can add to the rustic charm.
Hardware and Adhesives
These components ensure the structural integrity of your table.
- Screws: You’ll primarily need pocket hole screws (2 ½-inch and 1 ½-inch) if using a pocket hole jig, and general-purpose wood screws (3-inch to 4 ½-inch) for other connections.
- Glue: High-quality wood glue, such as Titebond 3, is essential for strong, durable joints, especially when laminating tabletop boards.
- Other: Washers might be used with lag bolts for attaching legs, and wood plugs are optional for concealing visible screw heads for a cleaner finish.
Tools Required
While some projects call for extensive workshops, many DIY farmhouse tables can be built with a core set of power tools.
- Cutting Tools: A miter saw is invaluable for accurate crosscuts, while a circular saw is perfect for longer rips and can be used for crosscuts with a guide. A jigsaw can be useful for notches or curves, and a table saw or jointer can achieve perfectly straight and square edges, though they are not strictly necessary if you select good lumber and use careful techniques with other saws.
- Joining Tools: A Kreg Jig (pocket hole jig) is highly recommended for creating strong, concealed joints, making assembly much simpler for beginners. A reliable drill/driver for pre-drilling holes and driving screws is indispensable. Long clamps are critical for applying even pressure when gluing up tabletop boards, ensuring tight, flat seams.
- Finishing Tools: An orbital sander is a must for smoothing wood surfaces, along with an assortment of sandpaper grits (80, 120, 180, 220). Brushes or foam applicators will be needed for applying stains and topcoats, and paper towels or a tack cloth for wiping away dust and excess finish.
Step-by-Step Guide to Building Your Budget Farmhouse Table
Building your own farmhouse dining table is a rewarding process that breaks down into several manageable stages. Careful planning and execution at each step will ensure a sturdy and beautiful final product.
Planning Your Table
The foundation of any successful DIY project is thorough planning. Before making any cuts, clearly define your table’s specifications.
- Determine Desired Dimensions: Consider the number of people you want to seat, the size of your dining space, and the clearance needed around the table. Standard dining table height is typically 30-31 inches. Widths often range from 36-42 inches, while length can vary greatly.
- Sketch Your Design or Follow Existing Free Plans: Decide on your preferred style (classic rectangular, trestle, square). Many free plans are available online that offer detailed cut lists and step-by-step instructions. These plans are an excellent starting point, especially for beginners, and can often be modified to suit your specific size requirements.
Cutting Your Lumber
Accuracy in this stage is paramount. “Measure twice, cut once” is a golden rule here.
- Accurately Cut All Pieces: Using your chosen cutting tools (miter saw for crosscuts, circular saw with a guide for ripping), cut all the individual components of your table: legs, aprons (the frame connecting the legs), stretchers (horizontal supports), and the individual boards that will form your tabletop.
- Inspect and Square Edges: Even with new lumber, edges might be slightly rounded or uneven. Using a jointer or carefully running boards through a table saw can square them up, which is vital for tight glue joints on the tabletop. For construction lumber, sanding rounded edges can help create a flatter appearance.
Assembling the Base
The base provides the essential support for your tabletop.
- Attach Aprons to Legs: Utilize a pocket hole jig to drill holes into the ends of your apron pieces. Apply wood glue to the joints before securing the aprons to the legs with pocket hole screws. This method creates strong, hidden joints.
- Add Stretchers and Supports: Depending on your design, add lower stretchers between the legs for additional stability and aesthetic appeal. Install middle table supports (often 2x4s) between the long aprons, flush with the top, using pocket holes and screws. These supports will help distribute the tabletop’s weight and provide attachment points.
Constructing the Tabletop
The tabletop is often the most visible and sometimes the most challenging part of the build. Patience is key for a smooth, flat surface.
- Glue Up Tabletop Boards: Arrange your tabletop boards to achieve the desired width and grain pattern. Apply a generous amount of wood glue along the edges that will be joined. Clamp the boards together tightly using long clamps, ensuring they are as flat and flush as possible. Allow the glue to cure completely, typically overnight, before removing clamps.
- Add Breadboard Ends (Optional): Breadboard ends are a classic farmhouse detail that helps prevent the tabletop from warping and provides a finished look. These are boards attached perpendicular to the main tabletop planks at each end. They require careful joinery (e.g., mortise and tenon or specialized pocket hole techniques) to allow for wood movement across the grain.
Attaching Top to Base
This step connects the two major components, allowing for the natural expansion and contraction of wood.
- Use Slotted Holes or Z-clips for Attachment: Wood naturally expands and contracts with changes in humidity. To prevent your tabletop from splitting, it’s crucial to use a method that accommodates this movement. Slotted holes drilled into the apron or support pieces (and slightly oversized screws) allow the tabletop to move freely. Alternatively, Z-clips (also known as tabletop fasteners) are designed specifically for this purpose and allow the top to float above the base while remaining securely attached.
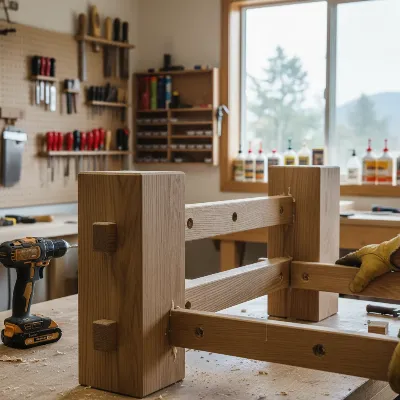 A DIY farmhouse dining table base being assembled with wood glue and pocket hole screws
Sanding and Finishing
The finishing touches bring out the beauty of the wood and protect your table for years to come.
- Sand Thoroughly: Start with a coarser grit sandpaper (e.g., 80 or 100) to remove any imperfections, glue squeeze-out, or unevenness. Gradually move to finer grits (120, 180, 220) for a smooth, touchable surface. Sanding in the direction of the wood grain is essential to avoid scratches.
- Apply Wood Conditioner: Especially for softwoods like pine, applying a wood conditioner before staining helps ensure an even stain absorption and prevents blotchiness.
- Stain or Paint Base/Top: Decide whether you want a solid stained look, a painted base with a stained top, or another combination. Apply your chosen stain or paint in thin, even coats, following manufacturer instructions. Popular farmhouse stains include weathered oak, early American, or even a white-wash effect.
- Apply Protective Topcoat: Once your stain or paint is dry, apply two to three thin coats of a durable polycrylic or polyurethane finish. This clear coat protects the wood from spills, scratches, and daily wear, significantly extending the life and beauty of your DIY farmhouse table. Lightly sand with a very fine grit (e.g., 220 or higher) between coats for a smoother final finish.
Comparison of DIY Approaches and Finishes
When building a DIY farmhouse dining table, you have several options for both construction and finishing that impact the table’s final look, complexity, and overall cost. Understanding these differences can help you choose the best approach for your skill level and desired aesthetic.
| Feature | Simple Slab Top | Breadboard Ends | Painted Base, Stained Top | All Stained Wood |
|---|---|---|---|---|
| Complexity | Low: Easy to glue up basic planks. | Medium: Requires precise joinery to account for wood movement. | Medium: Involves careful masking and two different finishes. | Medium: Requires consistent staining technique across all parts. |
| Material Cost | Low: Uses standard dimensional lumber for the top. | Medium: Might require slightly more specialized cuts or specific joinery hardware. | Low-Medium: Paint can be less expensive than certain stains or multiple stain colors. | Medium: Cost depends on the chosen stain and any wood conditioner needed. |
| Aesthetic | Rustic, straightforward, often highlights natural imperfections. | Classic farmhouse, refined edges, prevents warping. | Traditional, creates visual contrast and a lighter feel. | Unified wood look, emphasizes natural wood grain. |
| Time | Shorter: Less time spent on intricate joints or multiple finishes. | Longer: Additional time for cutting joinery, assembly, and drying. | Medium: Includes drying time for both paint and stain coats. | Medium: Requires multiple coats of stain and topcoat with drying time. |
| Tools | Basic: Circular saw, drill, clamps, sander. | Kreg Jig recommended for pocket holes, potentially a router for tongue and groove. | Basic woodworking tools + painting supplies (brushes, tape). | Basic woodworking tools + staining supplies (applicators, rags). |
Recommended Tools and Material Sourcing
To ensure your DIY farmhouse table project is a success, having the right tools and knowing where to source quality materials on a budget is key. These recommendations can help you make informed decisions before you begin.
Essential Tools
While a fully stocked workshop is a dream for many, a few core tools are indispensable for building a farmhouse dining table. A Kreg Jig (pocket hole jig) stands out for its ability to create strong, concealed joints with relative ease, making it a favorite for beginners and experienced woodworkers alike. A good quality drill/driver is crucial for pre-drilling holes and driving screws efficiently. Lastly, an orbital sander will save you countless hours and ensure a smooth, professional-looking finish. Investing in these three tools will cover a vast majority of your DIY furniture-building needs.
Lumber Sourcing
Finding good lumber at a fair price is fundamental for a budget-friendly build. While large home improvement stores like Lowe’s or Home Depot are convenient, sometimes local lumber mills can offer better quality dimensional lumber (e.g., 2x4s, 2x6s, 4x4s) at comparable or even better prices. When purchasing, always remember to carefully inspect each board. Look down the length of the board to check for warps, bows, or twists. Selecting straight, defect-free lumber from the start will save you significant time and frustration during the building process, ensuring your table comes out looking its best.
Finishing Products
The right finishes protect your table and define its aesthetic. Minwax offers a popular range of stains that are frequently used for farmhouse projects, including shades like Weathered Oak, Early American, and Simply White, allowing you to achieve various rustic or refined looks. For protection, polycrylic or polyurethane are excellent choices. Polycrylic is water-based, dries faster, and cleans up with water, making it a good option for a quick project. Polyurethane is oil-based, offering robust durability, though it has a longer drying time and requires mineral spirits for cleanup. Consider using a wood conditioner before staining softwoods like pine or fir to prevent blotchiness and achieve a more even color.
Maintenance Tips for Your DIY Farmhouse Table
Once you’ve poured your effort into building a beautiful DIY farmhouse dining table, proper care and maintenance are essential to preserve its beauty and durability for generations. Simple habits can significantly extend the life of your handmade piece.
General Care
The best defense against damage is proactive care. Wipe up any spills immediately with a soft cloth to prevent liquids from penetrating the finish and staining the wood. Always use coasters and placemats under glasses, hot dishes, and serving bowls. This protects the surface from heat rings, condensation marks, and scratches that can detract from the table’s appearance.
Wood Finishes
Depending on the finish you applied, specific care instructions will help maintain its integrity. Avoid harsh chemical cleaners, as these can strip or dull your table’s protective topcoat. Instead, use a damp cloth with a mild soap solution for general cleaning. For wood-specific finishes, a good quality wood cleaner or polish designed for finished wood can help keep the surface lustrous. Over time, you may notice areas of wear, especially on heavily used spots. Periodically reapplying a fresh coat of your chosen topcoat (polycrylic or polyurethane) can refresh the finish and provide renewed protection.
Protecting Against Damage
Beyond daily cleaning, consider these tips to safeguard your table from common hazards. Avoid placing your table in direct sunlight for prolonged periods, as UV rays can cause wood to fade, crack, or warp. If possible, rotate your table periodically to ensure even exposure. Similarly, try to maintain consistent humidity levels in your home, as extreme fluctuations can also lead to wood movement and cracking. For moving furniture or to protect floors, attach felt pads to the bottom of the table legs. These small additions can prevent scratches on your floors and make moving the table easier without damaging the legs.
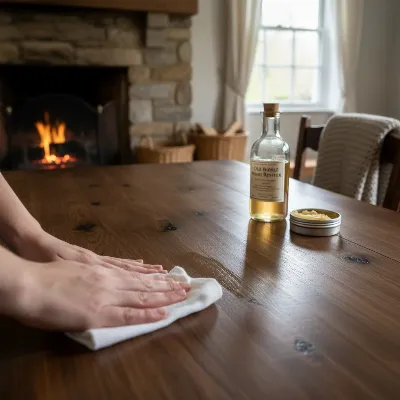 A person applying wood polish to a farmhouse dining table
Conclusion
Embarking on the journey to build your own DIY farmhouse dining table is more than just a woodworking project; it’s an investment in creating a personalized, enduring piece that truly reflects your style and provides a focal point for countless cherished moments. By embracing cost-effective materials like pine, mastering essential tools such as the Kreg Jig, and following a methodical step-by-step approach, you can construct a robust and beautiful table that defies its modest budget. The satisfaction of crafting something with your own hands, from selecting the lumber to applying the final protective coat, is unparalleled. This guide has equipped you with the knowledge to bring your vision to life, proving that a dream dining table doesn’t have to come with a prohibitive price tag. So, why not gather your tools, choose your design, and start building the heart of your home today?
Frequently Asked Questions
What is the best type of wood for a budget farmhouse table?
Pine or whitewood are excellent choices due to their affordability, wide availability, and ease of working with. While they are softer than hardwoods, their natural grain and ability to take stains well contribute perfectly to the rustic charm of a farmhouse table.
Can a beginner build a farmhouse dining table?
Absolutely! Many free plans available online are designed specifically with beginners in mind, often relying on straightforward joinery techniques like pocket holes. Patience, attention to detail, and a willingness to learn basic power tool usage are the most important prerequisites for success.
How much does it cost to build a DIY farmhouse table?
With careful material selection, focusing on common and economical dimensional lumber, many DIY farmhouse tables can be built for under $200. This is a significant saving compared to purchasing a similar table from a retail store.
How do I prevent my farmhouse table from looking “too DIY”?
To achieve a professional look, focus on meticulous sanding for a smooth finish, ensure your joinery is tight and flush, and apply a high-quality stain and protective topcoat evenly. Selecting straight lumber from the outset also plays a crucial role in the overall finished appearance.
What is the standard height for a dining table?
Standard Dining Table height typically ranges from 30 to 31 inches. This dimension is designed to comfortably accommodate most standard dining chairs, ensuring a pleasant and ergonomic dining experience.