Refinishing an old wooden dining table can transform a worn-out piece into a stunning centerpiece, offering a cost-effective and personalized alternative to buying new. This comprehensive guide details the essential steps, from preparation and stripping to sanding, staining, and applying a protective finish, ensuring a durable and beautiful result. The process typically takes 2-5 days, depending on the table’s size and chosen finishes.
Understanding Your Wooden Dining Table
Before embarking on your refinishing journey, understanding the nuances of your wooden dining table is crucial for a successful outcome. Different wood types respond uniquely to various products and techniques, and accurately assessing the table’s current condition dictates the necessary steps.
Types of Wood
Wooden dining tables are crafted from a variety of hardwoods and softwoods, each with distinct characteristics. Oak and walnut are dense hardwoods known for their strength and prominent grain patterns, requiring finishes that can penetrate deeply. Maple and birch offer lighter tones and good wear resistance, but their light color can be prone to staining, often benefiting from water-based polyurethanes. Pine, a softwood, is budget-friendly but softer, making it more susceptible to scratches and dents, and often requiring a pre-stain conditioner for even stain absorption. It is also vital to determine if your table is solid wood or veneer. Solid wood can be sanded more aggressively, while veneer, a thin layer of wood over a substrate, requires delicate handling to avoid sanding through it. For expert dining tables reviews on this site.
Assessing Table Condition
A thorough inspection of your dining table will help you tailor your refinishing approach. Look for existing damage such as deep scratches, gouges, cracks, or loose joints. The extent of the old finish’s wear and tear—whether it’s chipped, peeling, faded, or intact but simply dated—will dictate if a full chemical strip is necessary or if light sanding will suffice. This initial assessment ensures you select the most appropriate tools and materials for the job, preventing unnecessary work or potential damage.
Step-by-Step Guide to Refinishing Your Wooden Dining Table
Transforming your old wooden dining table into a refreshed masterpiece requires a systematic approach. Follow these steps carefully to ensure a durable and beautiful finish.
1. Preparation and Safety
Preparation is the foundation of any successful refinishing project. Begin by completely clearing the table of any items and disassembling it if possible (e.g., removing legs from the tabletop). Clean the entire surface thoroughly with a mild detergent and warm water to remove dirt, grease, and grime, then allow it to dry completely. Set up your workspace in a well-ventilated area, such as a garage with open doors or outdoors, as chemical strippers and some finishes produce strong fumes. Always prioritize safety: wear chemical-resistant gloves, eye protection, and a respirator mask to protect yourself from dust and fumes. Lay down drop cloths or old newspapers to protect your floors and surrounding areas from spills and sanding dust.
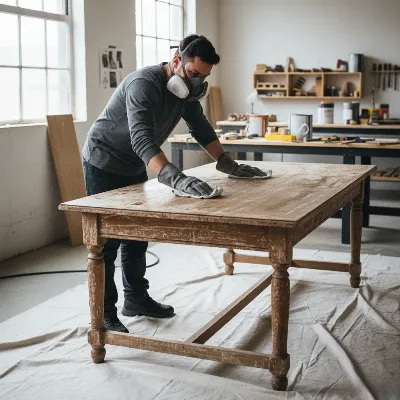 A person wearing gloves and a respirator mask cleaning a wooden dining table with a cloth in a well-ventilated workshop, demonstrating preparation and safety.
2. Stripping the Old Finish
|
Our Picks for the Best Dining Table in 2026
As an Amazon Associate I earn from qualifying purchases.
|
||
| Num | Product | Action |
|---|---|---|
| 1 | East West Furniture NFT-BLK-T Norfolk Kitchen Table - a Rectangle Dining Table Top with Butterfly Leaf, 32x54 Inch, Black |

|
| 2 | Signature Design by Ashley Bridson 6 Piece Dining Set, Includes Rectangular Dining Table, 4 Ladderback Chairs & Bench, Wood, 36" W x 60.13" D x 30" H, Gray |
|
| 3 | Signature Design by Ashley Coviar 5 Piece Counter Height Dining Set, Includes Table & 4 Barstools, Brown |
|
| 4 | VECELO 3-Piece 63" Extendable Kitchen Table with Benches/Chairs, Modern Breakfast Dinette/Dining Room Set for 4/6/2, Small Space Saving Design, Easy Assembly |
|
| 5 | Winsome Groveland Wooden Square Dining Table |
|
| 6 | IDEALHOUSE Dining Table Set for 4, Kitchen Table with Upholstered Bench, Rectangular Dining Room Table Set with 2 Benches, 3 Piece Kitchen Table Set for Small Space, Apartment, Studio, Rustic Brown |
|
| 7 | Dining Table for 6-8, 63" Large Kitchen Table, Industrial Dining Room Table, Wooden Rectangular Table with Adjustable Feet, for Dinner, Kitchen, Walnut and Black CZ03BH |
|
| 8 | CONSDAN Small Dining Table for 2, Extendable Dining Table, Walnut Veneer and Solid Wood Structure – Space-Saving Design, Ideal for Compact Dining Space and Expands for Larger Dining Areas |
|
| 9 | Black Round Dining Table for 6 - Modern Circle 51 Inch Large Room Kitchen Dinning Tables for 4 to 6 Person Seats Small Spaces Wood Dinner Mesa De Comedor Redonda |
|
| 10 | Walker Edison Durango Distressed Solid Wood Dining Table, 72 Inch, Mahogany |
|
Removing the old finish is often the most demanding part but crucial for an even new finish. Chemical strippers are highly effective for this task. Products like Citristrip or Klean Strip (look for methylene chloride-free formulas) are popular choices. Apply a generous, even layer of the chemical stripper with a chip brush over the entire surface you wish to strip. Allow the stripper to sit for the recommended time, usually an hour or two, or even overnight for stubborn finishes, as per the product instructions. Do not let it dry out completely. Once the finish begins to bubble or soften, use a plastic putty knife or scraper to gently scrape off the old finish and stripper in the direction of the wood grain. For intricate areas or stubborn spots, steel wool or a stripping brush can be effective. After scraping, wipe the surface clean with mineral spirits or a damp cloth to remove any residue.
3. Sanding for a Smooth Surface
Sanding is essential for achieving a perfectly smooth surface that will accept new stain and finish evenly. Begin with a coarser grit sandpaper (e.g., 80 or 100 grit) to remove any remaining old finish, deep scratches, or imperfections. Work in small sections, always sanding with the grain of the wood. An orbital sander or palm sander can expedite this process on flat surfaces, but for edges and detailed areas, hand sanding is necessary. Gradually move to finer grits (150, then 220 grit) to smooth out the wood fibers and prepare the surface for staining. After each grit, thoroughly clean the table to remove all sanding dust, using a shop vacuum, damp cloth, or tack cloth, as residual dust can affect the final finish. Ensure the surface is completely dry before proceeding.
4. Staining for a New Look
Staining enhances the wood’s natural beauty and allows you to customize the table’s appearance. If you are working with softwoods like pine or maple, or woods with an open grain, apply a wood conditioner first. This helps the wood absorb stain more evenly, preventing blotchiness. Choose your stain type: oil-based stains penetrate deeply and offer a rich, warm look, while water-based stains dry faster and offer a clearer, less ambering effect. Apply the stain with a clean rag or high-quality brush, working in small sections and moving with the wood grain. Allow the stain to sit for a few minutes (check product instructions) before wiping off any excess with a clean, lint-free rag. For a darker or richer color, apply additional thin coats, allowing each coat to dry completely before applying the next. Always test your chosen stain on an inconspicuous area first to ensure you like the color.
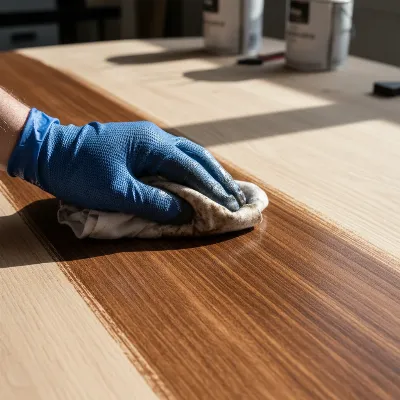 A hand applying wood stain to a sanded wooden dining table with a cloth, showing the staining process with even strokes.
5. Applying the Protective Finish
The final protective finish is vital for the durability and longevity of your refinished dining table. Common choices include polyurethane (oil-based or water-based), varnish, or lacquer. Oil-based polyurethane offers high durability and a warm, amber hue, while water-based polyurethane is clearer, dries faster, and maintains the wood’s natural color. Varnish, particularly marine-grade, provides exceptional durability, while lacquer offers a hard, thin finish. Apply the finish in thin, even coats with a high-quality brush or a wipe-on applicator. Avoid over-applying, as this can lead to drips or an uneven surface. Allow each coat to dry completely according to the manufacturer’s instructions. Lightly sand between coats with a very fine-grit sandpaper (e.g., 220 or 400 grit) to ensure maximum adhesion and a smooth finish, then clean off all dust before applying the next coat. Typically, 2-3 coats are recommended for dining table tops to ensure adequate protection. Allow the finish to cure fully, which can take several days to weeks, before heavy use.
Comparison of Wood Finishes
Choosing the right finish is paramount for your dining table’s longevity and appearance. Here’s a comparison of popular options:
| Feature | Oil-Based Polyurethane | Water-Based Polyurethane | Rubio Monocoat (Oil Finish) | Varnish |
|---|---|---|---|---|
| Durability | High; forms a durable, hard film. | Medium-High; durable, slightly less hard than oil-based. | Moderate; bonds with wood fibers, not a film. | Very High; extremely tough and moisture-resistant. |
| Application | Medium; can be thick, prone to brush strokes if not careful. | Easy; thinner, less odor, easier cleanup. | Easy; wipe-on, single coat application. | Medium; can be thicker, requires careful application. |
| Drying Time | Long (hours between coats, days to cure). | Short (1-2 hours between coats, days to cure). | Medium (several hours to dry, 10 days to fully cure). | Long (hours between coats, days to cure). |
| Appearance | Adds an amber tint, deepens wood color. | Clear, preserves natural wood color. | Enhances natural grain, matte finish. | Rich, deep finish, often with a slight amber hue. |
| Maintenance | Low; surface layer protects wood. | Low; good surface protection. | Requires reapplication to maintain effectiveness; easy touch-ups. | Low; highly protective. |
Reputable Refinishing Product Brands
Selecting quality products is key to a successful refinishing project. Several trusted brands offer a range of supplies for every step of the process.
Minwax
Minwax is a widely recognized brand for wood finishing products. They offer a comprehensive line of wood stains, including both oil-based and water-based options in a vast array of colors. Their pre-stain wood conditioners are highly effective at preventing blotchiness on soft or porous woods, ensuring an even stain application. Minwax also provides various protective clear finishes, such as their popular Polyurethane and Polycrylic, available in different sheens, offering reliable durability for dining tables.
Varathane
Varathane, another leading name in wood care, is known for its advanced finishes. Their stains are formulated for deep penetration and rich color, and their protective topcoats, like Varathane Diamond Wood Finish, are celebrated for their exceptional hardness and resistance to scratches, scuffs, and spills. They offer both oil and water-based clear coats, including “Triple Thick” polyurethane for maximum durability with fewer coats, making them a solid choice for high-traffic surfaces like dining tables.
General Finishes
For those seeking premium quality, General Finishes offers a renowned line of water-based stains, glazes, and topcoats. Their products are favored by many professionals and DIY enthusiasts for their ease of use, superior durability, and beautiful results. Their stains provide vibrant, consistent color, and their high-performance topcoats offer excellent protection while maintaining a clear, non-yellowing finish that is perfect for preserving the natural beauty of lighter woods.
Citristrip / Klean Strip
When it comes to stripping old finishes, Citristrip and Klean Strip are go-to brands. Citristrip is well-regarded for its less harsh, low-VOC (volatile organic compound) formula with a pleasant citrus scent, making it more user-friendly for indoor projects. Klean Strip offers a range of powerful chemical strippers, including traditional and “green” formulations, capable of removing multiple layers of old paint and varnish quickly and efficiently. Always choose a formula appropriate for your workspace and wear adequate personal protective equipment.
Tips for Maintaining Your Refinished Wooden Dining Table
Once your wooden dining table is beautifully refinished, proper care will ensure its lasting beauty and durability for years to come.
Regular Cleaning
To keep your refinished dining table looking its best, regular and gentle cleaning is essential. Wipe down the surface after each meal with a soft, damp cloth to remove crumbs and spills. For a deeper clean, use a mild, pH-neutral wood cleaner specifically designed for finished wood, or a solution of mild dish soap and water. Always avoid harsh chemical cleaners, abrasive scrubbers, or silicone-based polishes, as these can damage the protective finish or leave behind residue. Immediately wipe up any spills to prevent water rings or stains from setting in.
Protection from Damage
Protecting your dining table from daily wear and tear is crucial. Always use coasters under drinks to prevent moisture rings, and place mats or tablecloths under hot dishes to shield the surface from heat damage. Be mindful of sharp objects, as cuts and scratches can compromise the finish. Consider using felt pads under decorative items or serving pieces to avoid scratching the tabletop when moving them. For homes with children or pets, additional protection like a custom-cut glass top or a heavy-duty table protector might be a worthwhile investment.
Periodic Reapplication/Touch-Ups
Even with careful maintenance, your dining table’s finish may show signs of wear over time, especially in high-traffic areas. Periodically inspect your table for dullness, minor scratches, or areas where the finish appears thin. For finishes like oil-based polyurethanes, you may be able to lightly sand and apply another thin coat to refresh the protection. For oil-penetrating finishes, periodic reapplication as per the product’s instructions is necessary to maintain their effectiveness and appearance. Minor scratches can sometimes be disguised with touch-up pens or furniture repair kits. Addressing these small issues promptly can prevent them from worsening and prolong the overall life of your refinished table.
> “Refinishing a dining table is more than just a DIY project; it’s an act of preserving history and creating a focal point that truly reflects your personal style. The key lies in patience and meticulous attention to each step.” – Maria Sanchez, Furniture Restoration Expert
Conclusion
Refinishing an old wooden dining table is a transformative project that allows you to salvage a cherished piece, save money, and infuse your living space with personalized charm. By meticulously following the steps of preparation, stripping, sanding, staining, and applying a protective finish, you can achieve professional-looking results. Remember the importance of proper product selection and ongoing maintenance to ensure your table remains a beautiful and functional centerpiece for years to come. This DIY endeavor not only enhances your home but also provides immense satisfaction in creating something truly unique. What story will your newly refinished dining table tell?
Frequently Asked Questions
Is it worth it to refinish an old dining table?
Absolutely! Refinishing an old dining table is often more cost-effective than buying a new solid wood piece and allows you to customize the look to perfectly match your home decor. It also gives new life to an existing piece, especially if it holds sentimental value.
What’s the easiest way to remove old finish from a wooden dining table?
While sanding can remove old finishes, chemical strippers like Citristrip or Klean Strip are generally considered the easiest and most efficient method, especially for stubborn or multi-layered finishes. They soften the old finish, allowing it to be scraped off with minimal effort.
How long does it take to refinish a dining table?
The time required varies depending on the table’s size, the existing finish, and the chosen new finish. Typically, a full refinishing project can take anywhere from 2-5 days, including drying and curing times for stains and topcoats. Patience between coats is crucial for quality results.
What sandpaper grit should I use for refinishing a wooden dining table?
Start with a coarser grit (e.g., 80 or 100) to remove the old finish and deep imperfections. Then, progress to medium (150 grit) and fine (220 grit) sandpaper to smooth the wood fibers. For sanding between topcoats, use very fine grits like 220 or 400.
Can I refinish a veneer dining table?
Yes, you can refinish a veneer dining table, but with extreme caution. Veneer is a very thin layer of wood, so aggressive sanding can easily go through it and damage the table. It’s best to use a chemical stripper for the old finish and then hand-sand very lightly with fine-grit sandpaper (220 or higher) to avoid penetrating the veneer.
How do I avoid a blotchy stain on my wooden dining table?
To prevent blotchiness, especially on soft or porous woods, always apply a wood conditioner before staining. Ensure the wood is thoroughly sanded evenly, and always wipe off excess stain within a few minutes of application. Applying multiple thin coats rather than one thick coat also helps achieve an even color.
Frequently Asked Questions
Is it worth the effort to refinish an old dining table?
Absolutely, refinishing an old dining table is often more cost-effective than purchasing a new solid wood piece. It allows for complete customization to match your home decor and breathes new life into a cherished item, especially those with sentimental value.
What is the easiest method to remove old finish from a wooden dining table?
Chemical strippers like Citristrip or Klean Strip are generally the easiest and most efficient way to remove old finishes, particularly stubborn or multi-layered ones. These products soften the finish, allowing it to be scraped off with minimal effort compared to extensive sanding.
How long does a complete dining table refinishing project typically take?
A full refinishing project for a dining table can take anywhere from 2 to 5 days. This timeframe includes the necessary drying and curing periods for stains and topcoats, which are crucial for achieving quality and durable results.
Which sandpaper grits should be used when refinishing a wooden dining table?
Begin with a coarser grit (e.g., 80 or 100) to remove the old finish and deep imperfections. Progress to medium (150 grit) and then fine (220 grit) sandpaper to smooth the wood fibers. For sanding between topcoats, use very fine grits like 220 or 400 to ensure proper adhesion.
Can a veneer dining table be successfully refinished?
Yes, a veneer dining table can be refinished, but it requires extreme caution due to the veneer's thinness. It is best to use a chemical stripper for the old finish and then hand-sand very lightly with fine-grit sandpaper (220 or higher) to avoid sanding through the delicate veneer layer.
What steps prevent a blotchy stain on a wooden dining table?
To prevent blotchiness, especially on soft or porous woods, always apply a wood conditioner before staining. Ensure the wood surface is thoroughly and evenly sanded, and always wipe off any excess stain within a few minutes of application. Applying multiple thin coats instead of one thick coat also helps achieve a more consistent color.
How to Refinish a Wooden Dining Table
Transform your old wooden dining table into a beautiful new centerpiece by following these systematic steps for preparation, stripping, sanding, staining, and applying a protective finish.
Clear the table, disassemble if possible, and clean the surface with mild detergent. Set up your workspace in a well-ventilated area and wear chemical-resistant gloves, eye protection, and a respirator mask. Lay down drop cloths to protect surrounding areas.
Apply a generous, even layer of chemical stripper (e.g., Citristrip or Klean Strip) with a chip brush. Allow it to sit for 1-2 hours, or as recommended, then gently scrape off the softened finish with a plastic putty knife. Clean the surface with mineral spirits or a damp cloth.
Start sanding with 80 or 100-grit sandpaper to remove remaining finish and imperfections, working with the wood grain. Progress to 150-grit, then 220-grit sandpaper to smooth the wood fibers. Thoroughly clean off all sanding dust after each grit.
Apply a wood conditioner if working with softwoods. Choose an oil-based or water-based stain and apply it with a clean rag or brush, moving with the wood grain. Allow the stain to sit for a few minutes, then wipe off excess. Apply additional thin coats for a darker color, allowing each to dry completely.
Apply 2-3 thin, even coats of your chosen protective finish (polyurethane, varnish, or lacquer) with a high-quality brush or applicator. Allow each coat to dry completely according to manufacturer instructions. Lightly sand between coats with 220 or 400-grit sandpaper for maximum adhesion and a smooth finish, cleaning off dust before the next coat.
Get our weekly buyer guide
Practical specs, not advice. Unsubscribe anytime.
I followed this guide to refinish my grandmother’s old oak dining table, and it looks absolutely incredible! The step-by-step instructions for stripping and sanding were so clear, even for a beginner like me. It took me about 4 days total, but the result is a beautiful, durable finish that feels brand new. Highly recommend giving this a try instead of buying a new table.
I tried to refinish my dining table using these steps, and while the preparation and stripping went well, I struggled a bit with getting a perfectly smooth finish during the sanding phase. I think my table might have been a trickier wood type than I realized. It’s an improvement, but not quite the ‘stunning centerpiece’ I was hoping for. Maybe I needed more specific advice for very old, damaged wood.
This guide was super helpful for tackling my cherry wood table. I appreciated the tips on understanding different wood types before starting. My only minor complaint is that the drying times for the protective finish seemed a bit longer than I anticipated, which stretched the project out a bit. Still, the final look is fantastic and saved me a ton of money.
I’ve been wanting to update my dining room without breaking the bank, and refinishing my existing table was the perfect solution. The detailed steps for applying the stain really made a difference in getting an even, rich color. My old pine table now looks like a high-end piece. So glad I found these instructions!